
Igor Aleksandrov
Thursday, May 2, 2024 | 17 minutes
Computer Vision in Azure Cognetive Services
Select the appropriate service for a computer vision solution
The Azure AI Vision service is crafted to assist in extracting information from images. It offers functionality for:
Generating descriptions and tags: This involves determining a suitable caption for an image and identifying relevant “tags” that serve as keywords indicating its subject.
Object detection: Detecting the presence and location of specific objects within the image.
People detection: Identifying the presence, location, and features of individuals in the image.
Analysis of image metadata, color, and type: Determining the format and size of an image, its dominant color palette, and whether it contains clip art.
Category identification: Assigning an appropriate categorization for the image and recognizing any known landmarks it may contain.
Background removal: Detecting the background in an image and producing the image with the background transparent or a grayscale alpha matte image.
Moderation rating: Assessing whether the image includes any adult or violent content.
Optical character recognition (OCR): Extracting text from the image.
Smart thumbnail generation: Identifying the primary region of interest in the image to create a smaller “thumbnail” version.
You have the option to set up Azure AI Vision either as a standalone service resource or integrate it into a multi-service Azure AI Services resource using the Azure AI Vision API.
Analyze an image
To analyze an image, you have the flexibility to utilize either the Analyze Image REST method or its equivalent method in the SDK tailored to your preferred programming language. In this process, you specify the visual features you wish to incorporate in the analysis, including options to include details of celebrities or landmarks if you select categories. Upon execution, this method yields a JSON document containing the requested information.
Available visual features are contained in the VisualFeatures enum:
- VisualFeatures.Tags: Identifies tags about the image, including objects, scenery, setting, and actions
- VisualFeatures.Objects: Returns the bounding box for each detected object
- VisualFeatures.Caption: Generates a caption of the image in natural language
- VisualFeatures.DenseCaptions: Generates more detailed captions for the objects detected
- VisualFeatures.People: Returns the bounding box for detected people
- VisualFeatures.SmartCrops: Returns the bounding box of the specified aspect ratio for the area of interest
- VisualFeatures.Read: Extracts readable text
The selection of visual features to be analyzed in the image dictates the content of the response. Typically, responses include either a bounding box (if a location in the image is discernible) or a confidence score (applicable for features like tags or captions).
Azure AI Vision models
Custom Azure AI Vision models offer distinct functionalities based on their types. These types encompass Image Classification, Object Detection, and Product Recognition.
Components of a custom Vision project
To create a custom Azure AI Vision model, you first need an Azure AI Services resource (or an Azure AI Vision resource). Once that resource is deployed to your subscription, you need to create a custom project.
The initial phase of a custom project involves setting up the dataset, which consists of a collection of images for model training, along with a COCO file providing label information about these images. This dataset resides within an Azure blob storage container. Further details about the COCO file will be discussed later in this unit.
After defining your images and class labels, you proceed to train your custom model. During this phase, you specify the model type, dataset to be utilized, and your allocated training resources (in terms of time). Upon completion of model training, you can evaluate its performance and employ it for predictions.
Typically, the following steps are followed:
- Establish a blob storage container and upload the training images.
- Create the dataset for your project and link it to your blob storage container, specifying the project type (image classification, object detection, or product recognition).
- Label your data using Azure Machine Learning Data Labeling Project, generating the COCO file within your blob storage container.
- Connect the finalized COCO file containing labeled images to your dataset.
- Proceed with training your custom model using the dataset and associated labels.
- Assess performance and iterate if the trained model’s performance falls short of expectations.
Upon achieving satisfactory performance, the model becomes ready for utilization in Vision Studio or integration into your own application.
COCO files
A COCO file is a JSON file structured in a specific format, encompassing the following key elements:
- images: This section defines crucial attributes of the images, including their location in blob storage, name, width, height, and a unique identifier (ID).
- annotations: Annotations detail the classifications or objects present in the images. It includes information such as the category the image is classified under, the area covered by the object, and the bounding box coordinates (applicable for object detection labeling).
- categories: This part specifies the IDs corresponding to named label classes.
In most scenarios, COCO files are generated by labeling your training images within an Azure Machine Learning Data Labeling Project. Alternatively, if you’re transitioning from an older Custom Vision project, you can utilize a migration script to facilitate the creation of your COCO file.
A sample COCO file
{
  "images": [
    {
      "id": 1,
      "width": 1024,
      "height": 768,
      "file_name": "abc.jpg",
      "coco_url": "AmlDatastore://fruit/abc.jpg",
      "absolute_url": "https://myBlobStorage.blob.core.windows.net/fruit/abc.jpg",
      "date_captured": "<date>"
    },
    {
      "id": 2,
      "width": 1024,
      "height": 768,
      "file_name": "xyz.jpg",
      "coco_url": "AmlDatastore://fruit/xyz.jpg",
      "absolute_url": "https://myBlobStorage.blob.core.windows.net/fruit/xyz.jpg",
      "date_captured": "<date>"
    },
    <...>
  ],
  "annotations": [
    {
      "id": 1,
      "category_id": 1,
      "image_id": 1,
      "area": 0.0
    },
    {
      "id": 2,
      "category_id": 1,
      "image_id": 2,
      "area": 0.0
    },
    <...>
  ],
  "categories": [
    {
      "id": 1,
      "name": "apple"
    },
    {
      "id": 2,
      "name": "orange"
    },
    {
      "id": 3,
      "name": "banana"
    }
  ]
}
If you’re labeling an object detection dataset, each annotation in the COCO file also contains a bounding box array with the values in the array being Left, Top, Width, and Height.
"bbox": [
    0.11803319477782331,
    0.41586723392402375,
    0.7765206955096307,
    0.3483334397217212
]
Creating your dataset
Once your images are stored in the blob storage container, you can proceed to create your training dataset either through the REST API or via Vision Studio. The REST request would resemble the following example:
curl -X PUT https://<endpoint>/computervision/datasets/<dataset-name>?api-version=<version>\
  -H "Content-Type: application/json" \
  -H "Ocp-Apim-Subscription-Key: <subscription-key>" \
  --data-ascii "
  {
    'annotationKind':'imageClassification',
    'annotationFileUris':['<URI>']
  }"
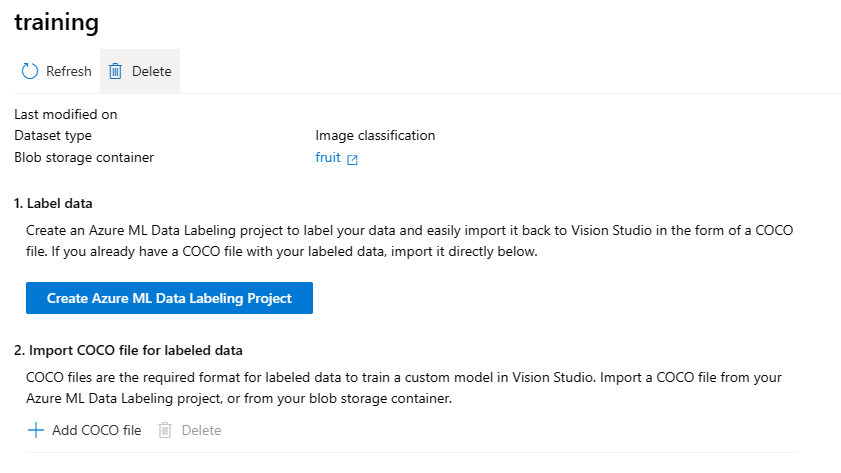
In Vision Studio, you’d proceed by navigating to the custom model tile, choosing your resource, and initiating the dataset creation process. From there, you can either open or create an Azure Machine Learning Data Labeling Project or upload an existing COCO file. The module exercise guides you through the steps of creating your dataset using this method.
Utilizing Vision Studio provides the advantage of connecting directly to your labeling project in Azure Machine Learning, eliminating the need to specify the COCO file in the REST request. While the examples in this module predominantly utilize Vision Studio, REST method examples are available on the documentation pages for those who prefer that approach.
Label and train a custom model
Once you upload your images to blob storage and created your dataset, the next step is to label your images and connect the resulting COCO file. If you already have a COCO file for your training images, you can skip the labeling step.
Labeling your training images
The process of labeling your training images occurs within Azure Machine Learning Studio, using the Data Labeling Project. Ensuring that your training images have complete and accurate labels significantly enhances the performance of your trained model. When labeling your images, it’s crucial to precisely assign labels and thoroughly label all instances of each class.
Within your dataset in Vision Studio, you can initiate this process by either creating a new Azure Machine Learning Data Labeling project or connecting to an existing project if you’ve already created one in Azure Machine Learning Studio.
After creating your project, clicking on that button will redirect you to Azure Machine Learning Studio, where the labeling project will be opened. Within Azure Machine Learning Data Labeling, you have the option to add categories for your images or objects, such as “apple,” “orange,” or “banana.” Once your categories are defined, you can commence your project and navigate to the labeling tab. Here, the task is to label 3-5 images per category, ensuring comprehensive coverage.
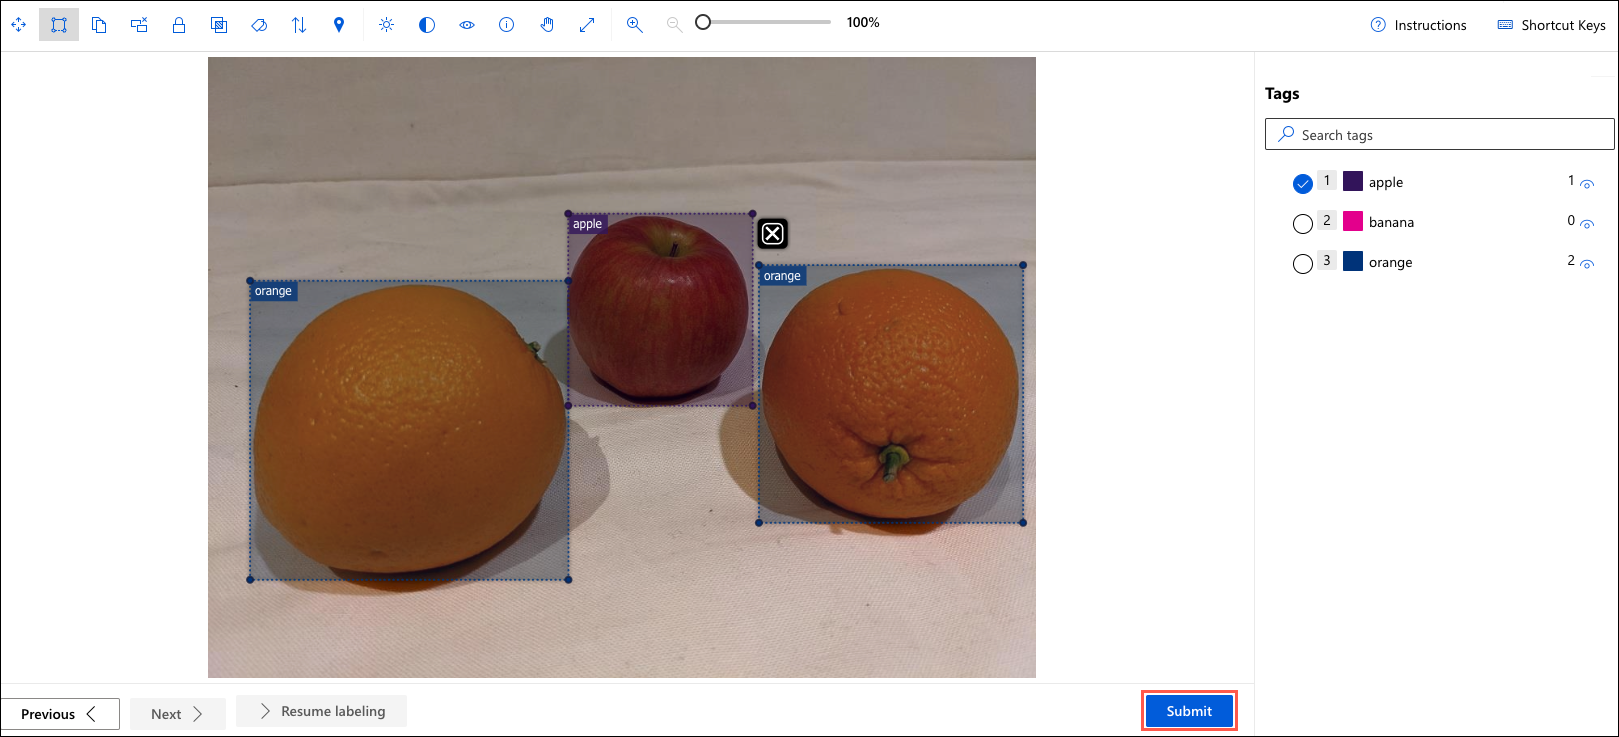
Azure Machine Learning offers tools like ML-assisted labeling, which can assist in the labeling process by using the labels provided for a subset of the images to automatically label the remaining images. However, it’s crucial to review these labels to ensure their accuracy. Inaccurate labels can lead to a decrease in the performance of your trained model.
Once the labeling process is finalized and all training images are accurately classified or labeled, you can seamlessly integrate your COCO file into your dataset directly from your Azure Machine Learning workspace. This simplifies the process of incorporating labeled data into your training pipeline.
Training your model
With all the training images labeled, the subsequent step is to train your model. During the training process, you’ll select the model type, specify the dataset you want to utilize as training data, and indicate the training budget. The training budget sets an upper limit on the duration of the training process; typically, the actual training time is less than the specified budget.
After your model has completed training, you can assess its performance by selecting it, which allows you to view the evaluation run results. If no evaluation dataset is provided during model training, the default evaluation run is conducted. This involves extracting a small subset of labeled images from the training set, using the trained model to make predictions on this subset, and comparing the predictions to the provided labels.
Once on the trained model page, you can initiate new evaluation runs using a different set of images or conduct your own tests within Vision Studio by selecting the corresponding tab at the top of the page. This enables you to further evaluate and fine-tune your model’s performance.
Detect, analyze, and recognize faces
The Azure AI Vision service
The Azure AI Vision service enables you to detect people in an image, as well as returning a bounding box for its location.
The Face service
The Face service offers more comprehensive facial analysis capabilities than the Azure AI Vision service, including:
- Face detection (with bounding box).
- Comprehensive facial feature analysis (including head pose, presence of spectacles, blur, facial landmarks, occlusion and others).
- Face comparison and verification.
- Facial recognition.
While all applications of artificial intelligence necessitate considerations for responsible and ethical use, systems that rely on facial data can present particular challenges.
When developing a solution that incorporates facial data, several considerations should be taken into account, including:
Data privacy and security: Facial data is inherently personally identifiable and should be treated as sensitive and private information. It’s imperative to implement robust measures to safeguard facial data used for model training and inference.
Transparency: Users should be fully informed about how their facial data is utilized and who has access to it. Transparency regarding the purpose and handling of facial data is essential for building trust with users.
Fairness and inclusiveness: Face-based systems must be designed to prevent discriminatory or biased outcomes. Special attention should be paid to ensuring that the system does not unfairly target individuals or perpetuate biases based on appearance. Fair and inclusive design principles should be incorporated into the development and deployment of face-based systems to mitigate potential harm.
These considerations, while not exhaustive, are crucial for ensuring the responsible and ethical use of facial data in AI systems.
Detect faces with the Azure AI Vision service
To detect and analyze faces with the Azure AI Vision service, call the Analyze Image function (SDK or equivalent REST method), specifying People as one of the visual features to be returned.
In images that contain one or more people, the response includes details of their location in the image and the attributes of the detected person, like this:
detect person
{
  "modelVersion": "2023-10-01",
  "metadata": {
    "width": 400,
    "height": 600
  },
  "peopleResult": {
    "values": [
      {
        "boundingBox": {
          "x": 0,
          "y": 56,
          "w": 101,
          "h": 189
        },
        "confidence": 0.9474349617958069
      },
      {
        "boundingBox": {
          "x": 402,
          "y": 96,
          "w": 124,
          "h": 156
        },
        "confidence": 0.9310565276194865
      },
    ...
    ]
  }
}
Understand capabilities of the face service
The Face service provides comprehensive facial detection, analysis, and recognition capabilities.
The Face service offers a range of functionalities, including:
Face detection: Identifying faces in an image and providing bounding box coordinates for their location.
Face attribute analysis: Extracting various facial attributes such as head pose, glasses, blur level, exposure, noise, occlusion, accessories, and quality for recognition.
Facial landmark location: Providing coordinates for key facial landmarks relative to facial features like eye corners, pupils, and the tip of the nose.
Face comparison: Comparing faces across multiple images to assess similarity or verify identity.
Facial recognition: Training a model with a collection of faces associated with specific individuals and using it to identify those individuals in new images.
Facial liveness detection: Determining if an input video stream is genuine or spoofed, aiding in preventing fraudulent attempts to bypass recognition systems.
You have the flexibility to provision the Face service as a standalone resource or integrate it into a multi-service Azure AI Services resource using the Face API.
Compare and match detected faces
When the Face service detects a face, it assigns a unique ID to it, which is stored in the service resource for a duration of 24 hours. This ID is represented as a GUID (Globally Unique Identifier) and does not contain any information about the individual’s identity other than their facial features. This approach helps maintain privacy and anonymity, as the ID does not directly link to any personal information.
While the detected face ID is cached, subsequent images can be employed to compare the new faces to the cached identity. This comparison enables the determination of whether the faces are similar, indicating shared facial features, or to verify that the same person appears in both images.
This capability to compare faces anonymously can be advantageous in systems where it’s crucial to confirm the presence of the same individual on two separate occasions without necessitating knowledge of their actual identity. For instance, it can be utilized in scenarios such as capturing images of individuals as they enter and exit a secured area to verify that everyone who entered has subsequently left.
Implement facial recognition
To train a facial recognition model using the Face service, follow these steps:
Create a Person Group: Define a Person Group that encompasses the set of individuals you intend to identify, such as employees or users.
Add Persons to the Person Group: Add a separate Person entity to the Person Group for each individual you want the model to recognize.
Add Detected Faces to Each Person: Incorporate detected faces from multiple images into each Person entity within the Person Group. It’s advisable to include faces captured in various poses to enhance the model’s robustness. These faces are referred to as persisted faces, as their IDs do not expire after 24 hours.
Train the Model: Initiate the training process for the model using the data provided in the Person Group. This enables the model to learn and recognize the facial features associated with each individual.
By following these steps, you can train a facial recognition model tailored to your specific application and requirements.
Explore Azure AI Vision options for reading text
Azure AI offers two distinct features for reading text from documents and images: one within the Azure AI Vision Service and the other in Azure AI Document Intelligence. While there is some overlap in their capabilities, each service is optimized to deliver results based on the nature of the input.
Here’s a comparison:
Image Analysis Optical Character Recognition (OCR):
- Ideal for processing general, unstructured documents with a smaller amount of text or images containing text.
- Results are promptly returned (synchronous) from a single API call.
- Offers additional functionalities beyond text extraction, such as object detection, image description, categorization, and smart-cropped thumbnail generation.
- Examples of suitable inputs include street signs, handwritten notes, and store signs.
Document Intelligence:
- Designed for reading text from images and PDF documents, handling small to large volumes of text.
- Utilizes document context and structure to enhance accuracy.
- The initial function call yields an asynchronous operation ID, necessitating a subsequent call to retrieve the results.
- Suited for processing documents like receipts, articles, and invoices.
Both technologies are accessible via the REST API or client libraries. While this module focuses on the OCR feature within Image Analysis, exploring the Document Intelligence module can offer a comprehensive understanding of its capabilities.
To utilize the Read OCR feature, invoke the ImageAnalysis function either through the REST API or its equivalent method in the SDK. You’ll provide the image URL or binary data as input, with the option to specify a gender-neutral caption or the language of the text (defaulting to English if unspecified).
When making an OCR request to ImageAnalysis, ensure to specify the visual feature as READ. This directs the service to prioritize text extraction from the provided image data.
result = client.analyze(
    image_url=<image_to_analyze>,
    visual_features=[VisualFeatures.READ]
)
If using the REST API, specify the feature as read.
https://<endpoint>/computervision/imageanalysis:analyze?features=read&...
The results of the Read OCR function are delivered synchronously, typically in JSON format or a language-specific object with a similar structure. These results are organized into blocks, with the current service typically utilizing only one block. Within each block, the text is further segmented into lines and words.
Moreover, the text values are provided at both the line and word levels, facilitating easier reading of entire lines of text without the need for individual word extraction. This hierarchical organization of text components simplifies text extraction and enhances readability for downstream processing tasks.
output example
{
    "metadata":
    {
        "width": 500,
        "height": 430
    },
    "readResult":
    {
        "blocks":
        [
            {
                "lines":
                [
                    {
                        "text": "Hello World!",
                        "boundingPolygon":
                        [
                            {"x":251,"y":265},
                            {"x":673,"y":260},
                            {"x":674,"y":308},
                            {"x":252,"y":318}
                        ],
                        "words":
                        [
                            {
                                "text":"Hello",
                                "boundingPolygon":
                                [
                                    {"x":252,"y":267},
                                    {"x":307,"y":265},
                                    {"x":307,"y":318},
                                    {"x":253,"y":318}
                                ],
                            "confidence":0.996
                            },
                            {
                                "text":"World!",
                                "boundingPolygon":
                                [
                                    {"x":318,"y":264},
                                    {"x":386,"y":263},
                                    {"x":387,"y":316},
                                    {"x":319,"y":318}
                                ],
                                "confidence":0.99
                            }
                        ]
                    },
                ]
            }
        ]
    }
}
Analyze video
The Azure Video Indexer service is tailored to assist in extracting information from videos, offering a range of functionalities, including:
Facial recognition: Detecting the presence of individual people in the video. Note that this feature requires Limited Access approval.
Optical character recognition (OCR): Reading text present within the video.
Speech transcription: Generating a text transcript of spoken dialogues in the video.
Topics identification: Identifying key topics discussed in the video content.
Sentiment analysis: Analyzing the positivity or negativity of segments within the video.
Labels: Providing label tags that identify key objects or themes appearing throughout the video.
Content moderation: Detecting adult or violent themes within the video to ensure content appropriateness.
Scene segmentation: Breaking down the video into its constituent scenes, aiding in content organization and analysis.
Azure Video Indexer includes predefined models for recognizing well-known celebrities, performing OCR, and transcribing spoken phrases into text. Additionally, you have the option to expand the recognition capabilities of Video Indexer by creating custom models for:
People: By adding images of the faces of individuals you wish to recognize in videos and training a model, Video Indexer can subsequently identify these individuals in all your videos.
Language: If your organization uses specialized terminology that may not be commonly recognized, you can train a custom model to detect and transcribe this specific language.
Brands: You can train a model to recognize specific names as brands. This capability allows you to identify products, projects, or companies relevant to your business within video content.
Use Video Analyzer widgets and APIs
Azure Video Indexer widgets
The widgets utilized within the Azure Video Indexer portal for playing, analyzing, and editing videos can be embedded into your custom HTML interfaces. This technique enables you to share insights derived from specific videos with others without granting them full access to your account in the Azure Video Indexer portal.
By embedding these widgets into your own custom HTML interfaces, you retain control over the presentation and dissemination of video insights, allowing you to tailor the viewing experience to your specific needs and preferences. This approach enhances collaboration and facilitates sharing of video analysis results within your organization or with external stakeholders.

Azure Video Indexer API
Azure Video Indexer provides a REST API that you can use to obtain information about your account, including an access token.
https://api.videoindexer.ai/Auth/<location>/Accounts/<accountId>/AccessToken
Using your token, you can access the Azure Video Indexer REST API to automate various video indexing tasks, such as creating projects, retrieving insights, and managing custom models.
For instance, by making a GET request to the endpoint https://api.videoindexer.ai/<location>/Accounts/<accountId>/Customization/CustomLogos/Logos/<logoId>?<accessToken>, you can retrieve the specified logo. Similarly, sending a GET request to https://api.videoindexer.ai/<location>/Accounts/<accountId>/Videos?<accessToken> will return details of videos in your account, typically in JSON format.
This level of access empowers you to programmatically interact with Azure Video Indexer, enabling automation and integration into your workflows and custom applications.
result JSON
{
    "accountId": "SampleAccountId",
    "id": "30e66ec1b1",
    "partition": null,
    "externalId": null,
    "metadata": null,
    "name": "test3",
    "description": null,
    "created": "2018-04-25T16=50=00.967+00=00",
    "lastModified": "2018-04-25T16=58=13.409+00=00",
    "lastIndexed": "2018-04-25T16=50=12.991+00=00",
    "privacyMode": "Private",
    "userName": "SampleUserName",
    "isOwned": true,
    "isBase": true,
    "state": "Processing",
    "processingProgress": "",
    "durationInSeconds": 13,
    "thumbnailVideoId": "30e66ec1b1",
    "thumbnailId": "55848b7b-8be7-4285-893e-cdc366e09133",
    "social": {
        "likedByUser": false,
        "likes": 0,
        "views": 0
    },
    "searchMatches": [],
    "indexingPreset": "Default",
    "streamingPreset": "Default",
    "sourceLanguage": "en-US"
}
Deploy with ARM template
Azure Resource Manager (ARM) templates are available to create the Azure AI Video Indexer resource in your subscription, based on the parameters specified in the template file.